canine freestyle moves database
teaching position using a rectangular platform
the platform
There is a video on YouTube on “How to make your own training platform Michele Pouliot style!”
(http://www.youtube.com/watch?v=SlucDKua0hA)
It shows one way of making a platform. Using rubber matting as shown in the video is ideal because the resultant platform is light and easy to transport, especially if you have 3 of them.

Fig. 1

Fig. 2
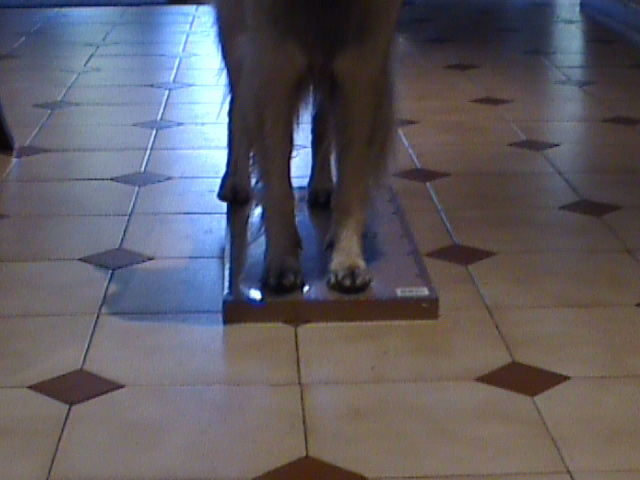
Fig. 3
Some dogs are not comfortable with any sort of “stick” near them, so the “measuring” of the area the dog requires for standing needs to be unobtrusive.
You could stand your dog on a tiled area (Fig. 1 and Fig. 2) and note how much of the tiled area is occupied by the dog. The dog needs to be standing comfortably and be fairly relaxed so that the front and back feet are not too close together, eg when the dog is “hunched”. Also you don’t want one of the back legs nervously extended sideways (see right rear paw in Fig. 2); this can increase the “width” of the dog’s stance.
Measure the distance occupied by the front feet (Fig. 2) and add no more than 2 inches either side. This will be the measurement of the short side (front) or width of the platform.
Measure the distance occupied by the front and back paws along one side of the dog (Fig. 1) and add a couple of inches. This will become the length of the platform.
The width of the platform is critical because you don’t want to give the dog room to easily turn around or to stand askew on it. The dog will learn to stand straight with a straight spine, that is, not stand crooked.
In Fig. 4 you can see the platform is much too wide, and gives the dog too much room for movement; even stand diagonally on the platform. This you don’t want. In Fig. 4 the platform is too big for the dog on it.
The length of the platform is not so critical, as the dog will always move to the “front” of the platform. The length should not be too long, because, it gives the handler too much opportunity to not stand in the correct position when teaching positions.
The surface of the platform needs to be “different” to the surrounding flooring and there has to be enough height on the platform so that the dog notices when not all four feet are on it.
If you cannot get the rubber matting as shown in the video, you can make them of timber and glue “Patio Carpet” to the top. Wooden platforms are heavy. Here is an example of one with “legs”.

Fig. 4

Front and Top View

Side View

Underside of platform
For stability, the “legs” of the platform must be as wide as the platform and glued to the edges (front and sides as shown) of the platform at each end and must be high enough for the dog to be able to detect when not all four feet are on it. If the legs are glued further in from the front of the platform, that is the front of the platform overhangs the leg underneath it, an enthusiastic dog with strong paws can hit the edge of the front of the platform and tip it up onto himself.
Wooden platforms work best on carpet as they may wobble slightly on hard surfaces like concrete or tiles. If placed on tiles they may slip, so rubber may need to be glued to the bottom of the “legs” to prevent slipping.
It is not mandatory, but 3 platforms are very useful.
Having made your platform(s) DO NOT PLACE IT ON THE GROUND to see what your dog will do. Put the platform away so that the dog cannot interact with it.
Once you start training, always put the platform(s) away so that they are not available to the dog.